Intelice Solutions: Blog

Want an Easy Way to Close Out Your 2017 Financials?
It’s Easy with Dynamics NAV 2017 & Office 365.
Here’s a step-by-step description detailing how to use Dynamics NAV to close out your financials for the year.
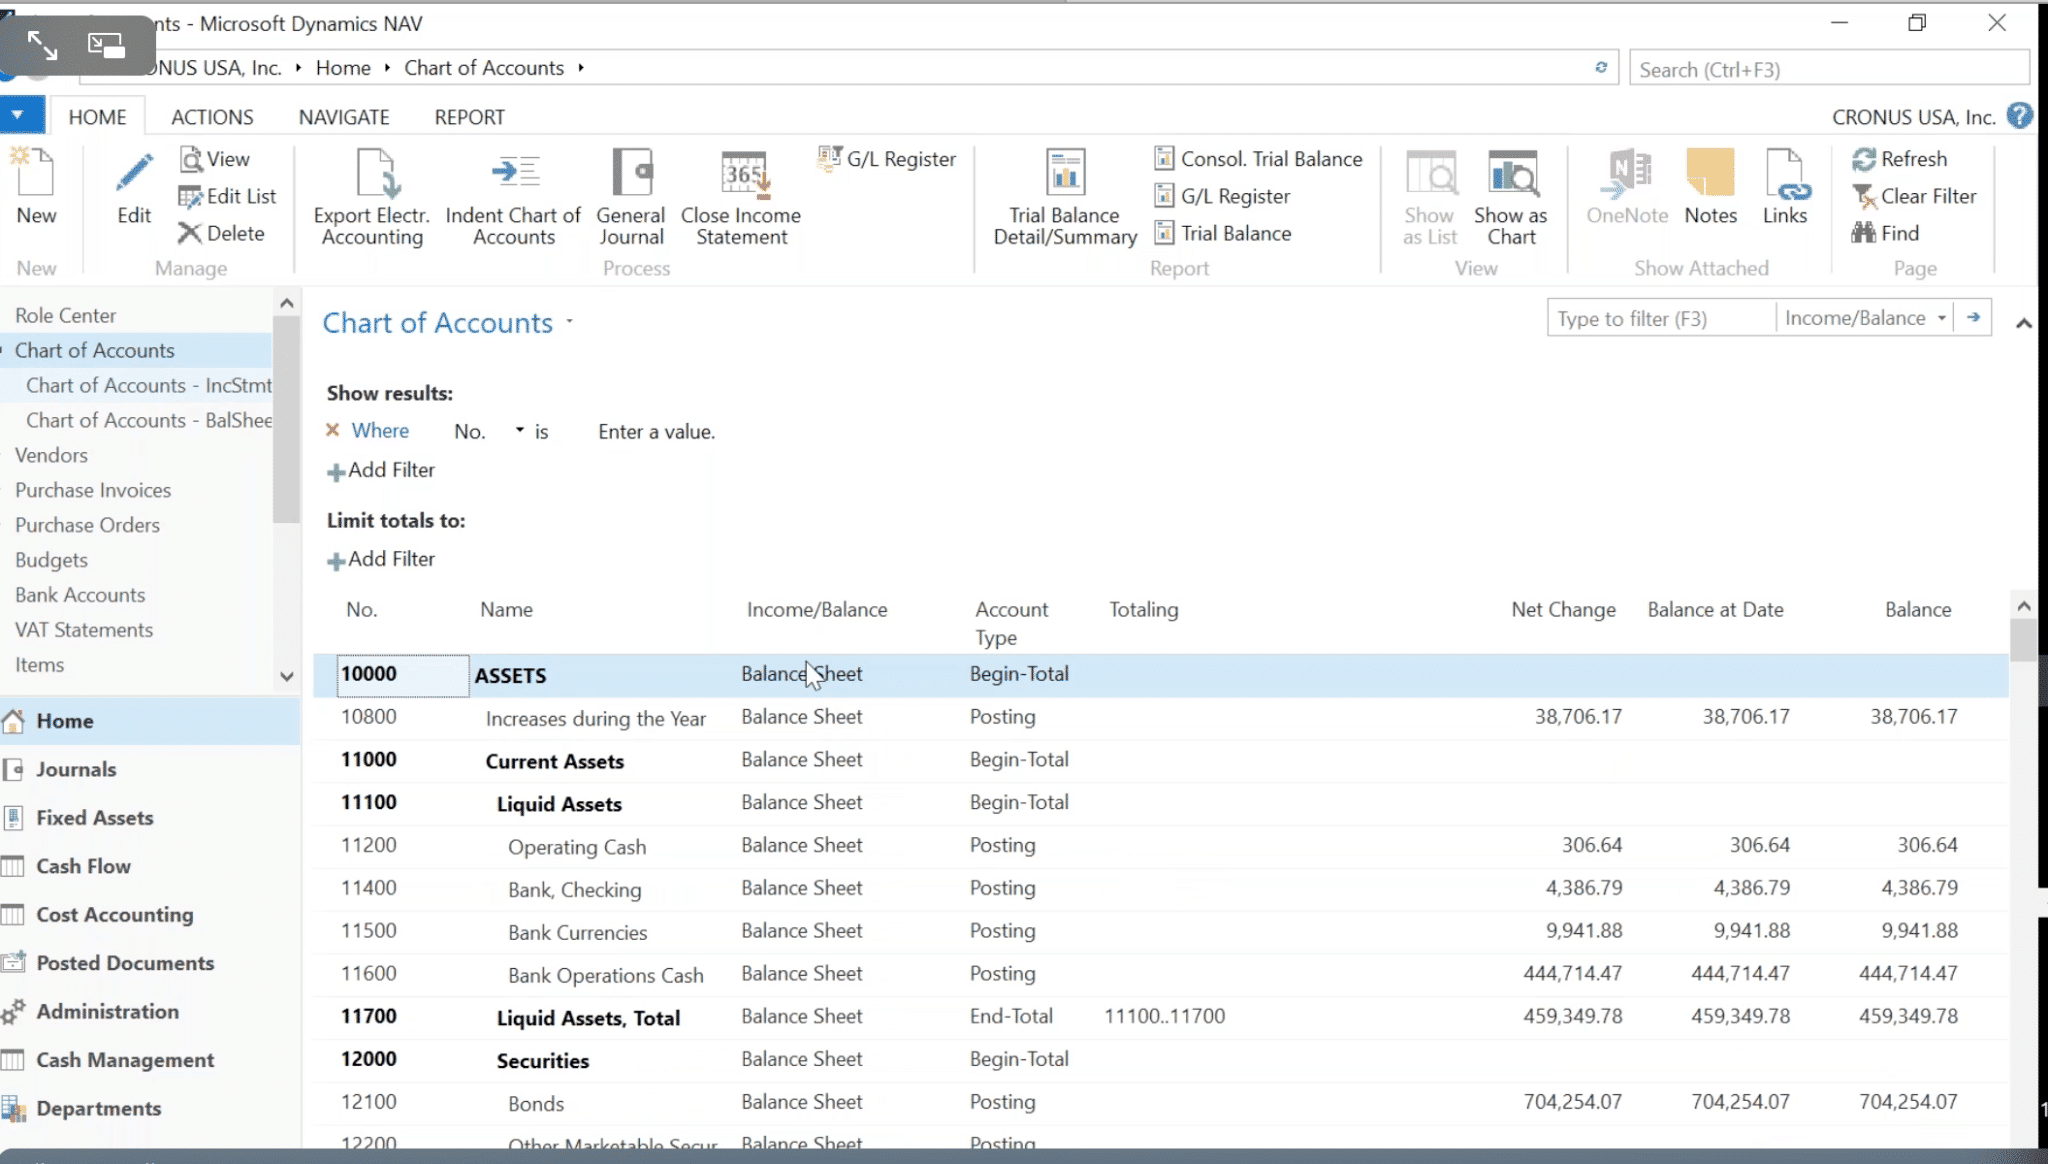
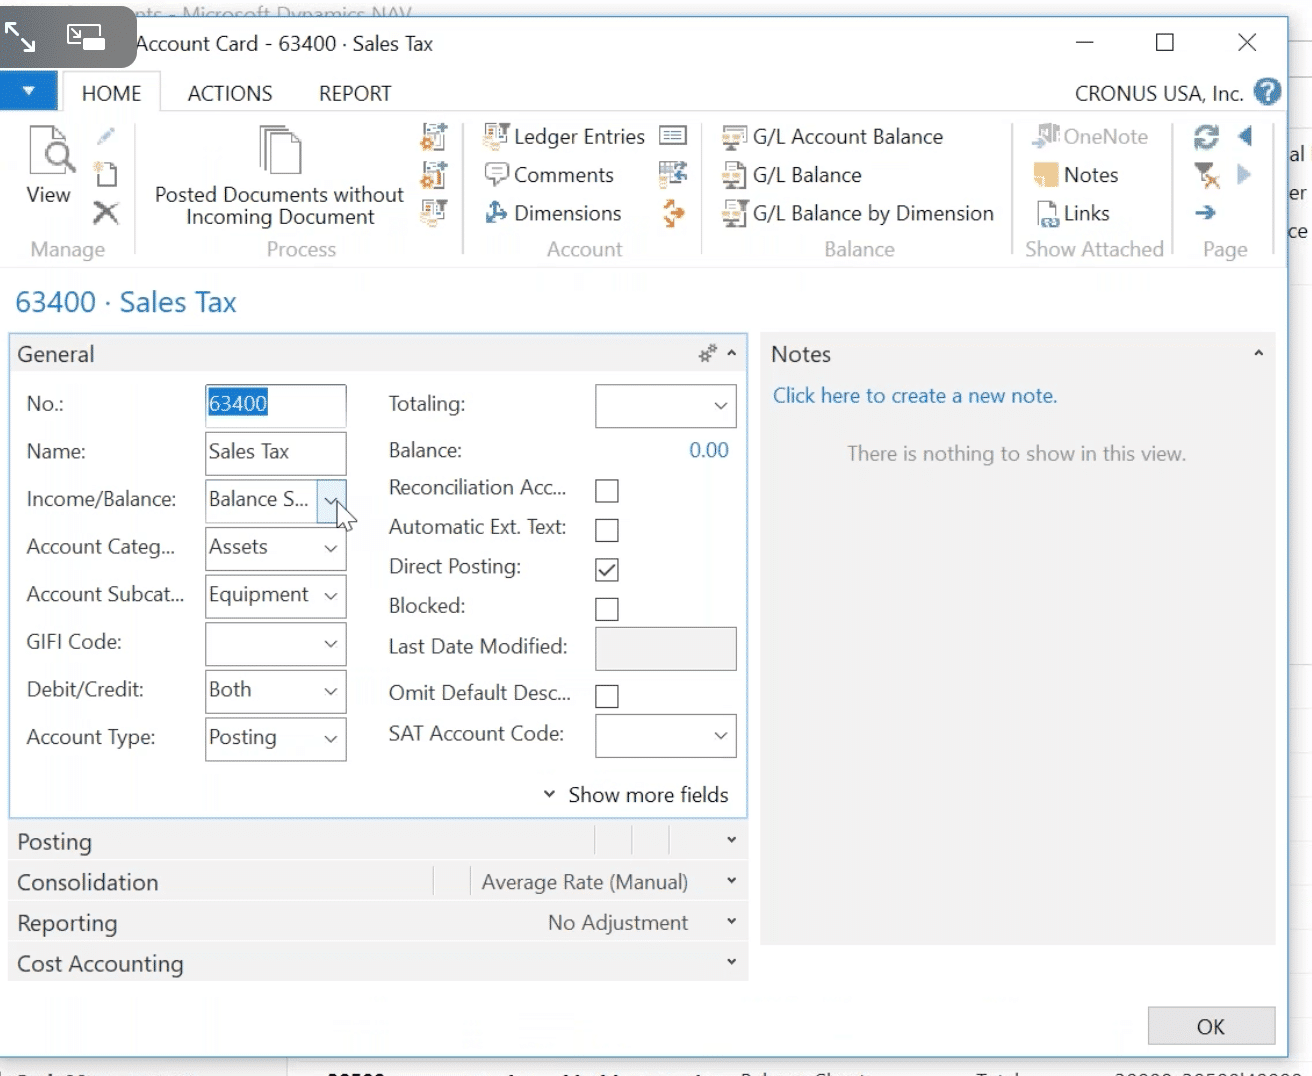
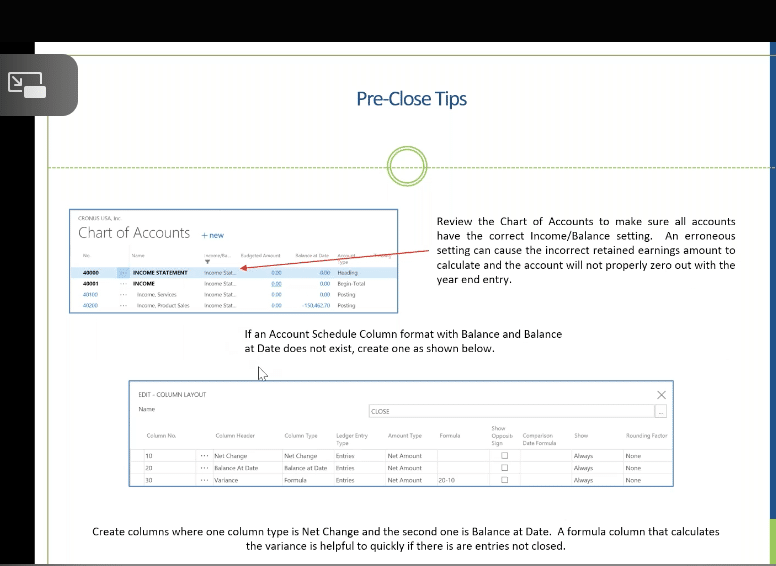
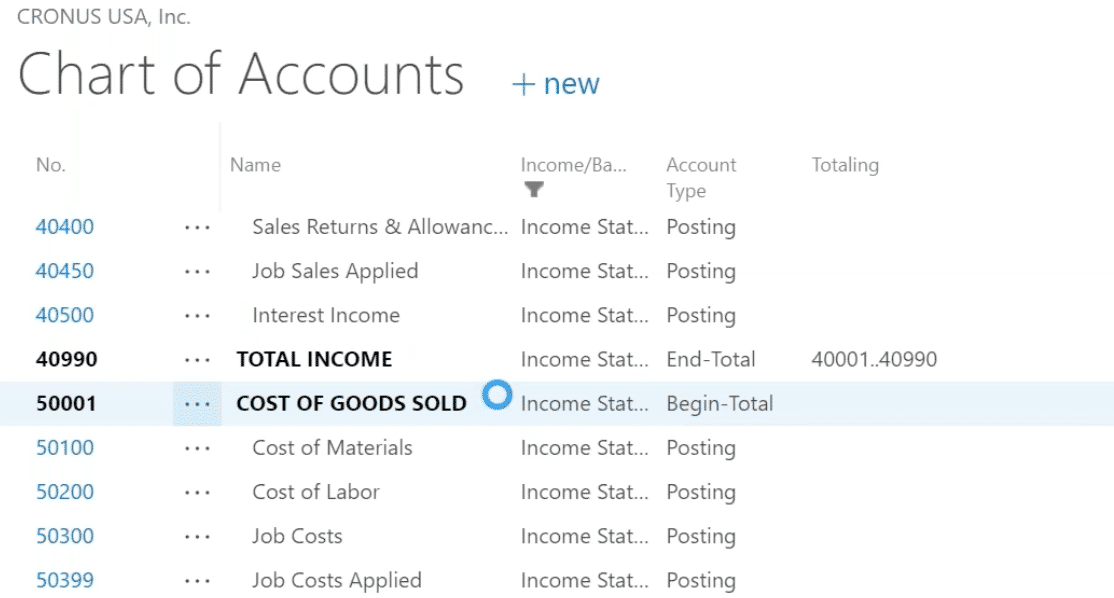
PRE-CLOSE TIPS: First you should review your Chart of Accounts to ensure they all have the correct Income/Balance settings. An erroneous setting can result in an incorrect retained-earnings amount to calculate and the account won’t properly zero out with the year-end entry.
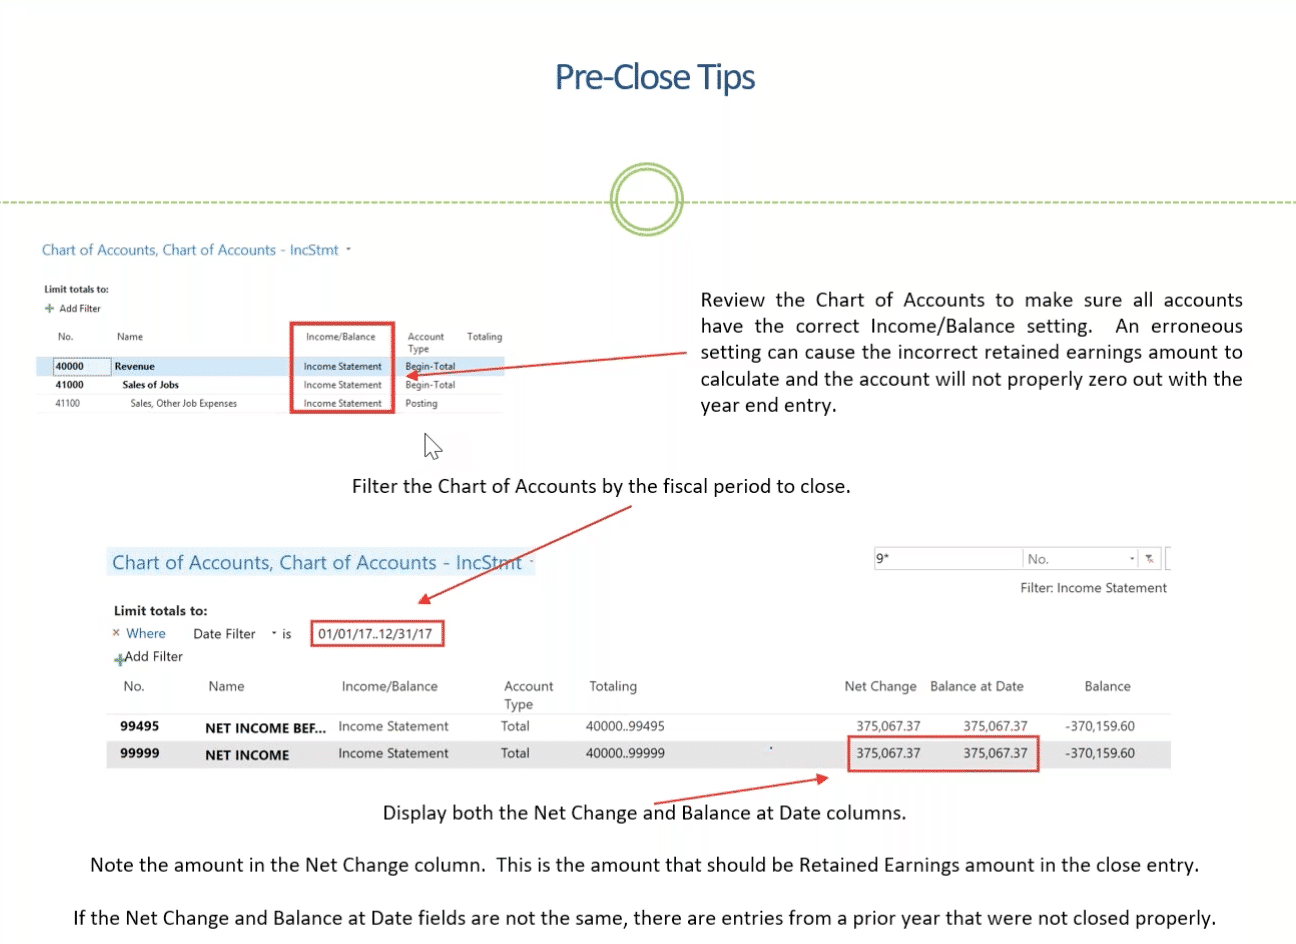
If your Net Change and Balance at Date don’t match you’ll need to go back to the previous year and close some entries.
Make sure you take care of all the tasks below before proceeding.
General Ledger
- Specify system-wide and user-specific posting period.
- Make all necessary G/L adjustments.
- Update and post Recurring Journals.
- Adjust Exchange rates (if using foreign currencies or other reporting currencies)
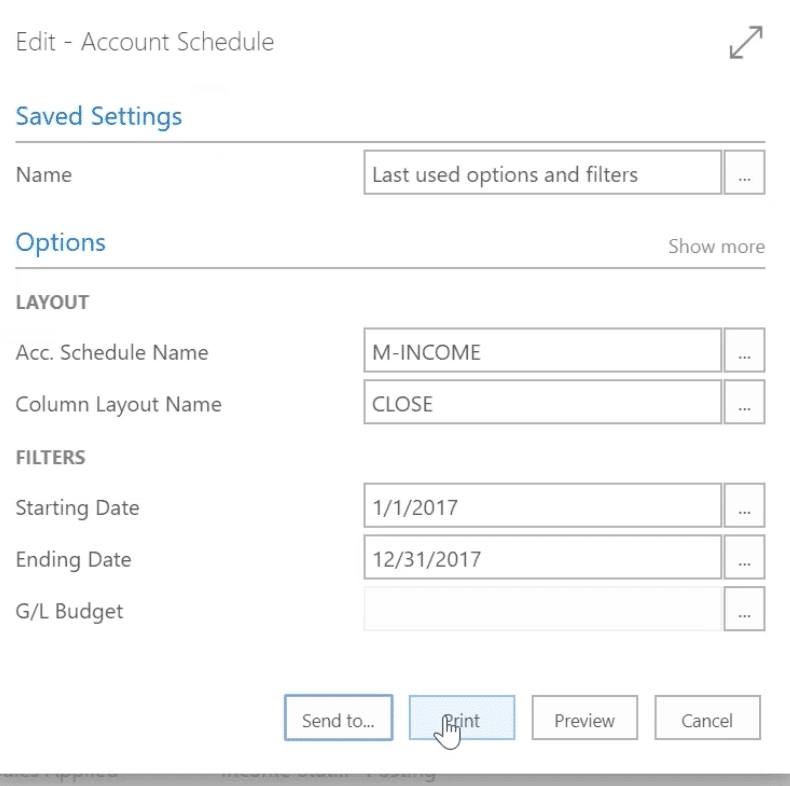
- Run account schedules as follows:
- Open the Account Schedule window, and choose the Print action.
- Fill the Account Schedule request window and choose the Print action.
Sales & Receivables
- Post all sales orders, invoices, credit memos, and return orders.
- Post all cash receipt journals
- Update and post recurring journals that are related to Sales & Receivables.
- Reconcile accounts receivable to the General Ledger
Purchases and Payables
- Post all purchase orders, invoices, credit memos, and return orders.
- Post all payment journals.
- Update and post recurring journals that are related to purchases & payables.
- Run the Aged Accounts Payable report and reconcile accounts payable to the general ledger.
Calculate and Process Sales Tax
- Complete Tax Statements
Fixed Assets
- Calculate Depreciation.
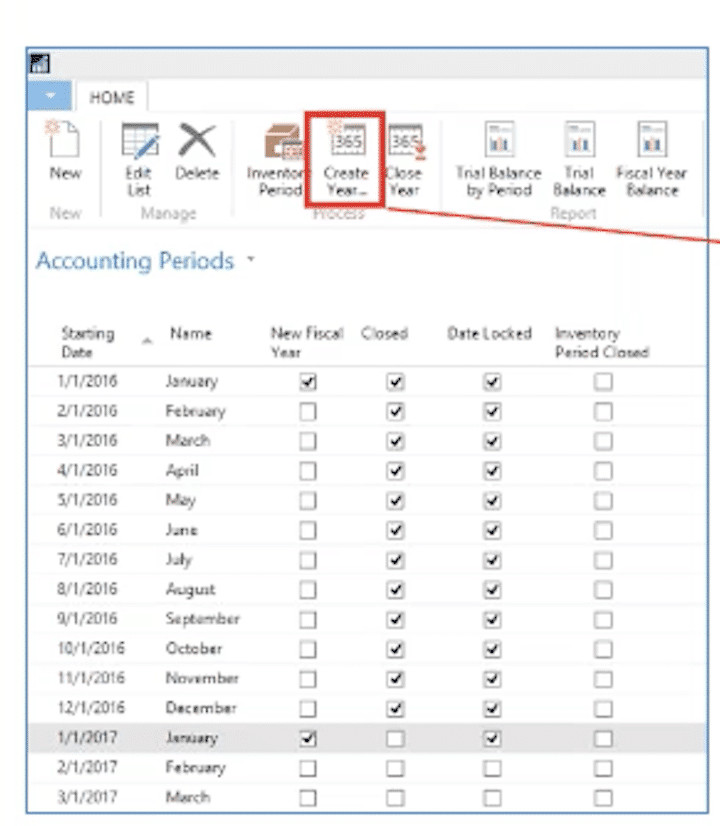
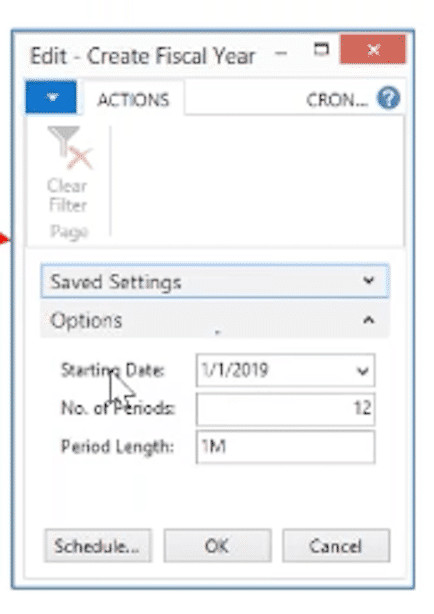
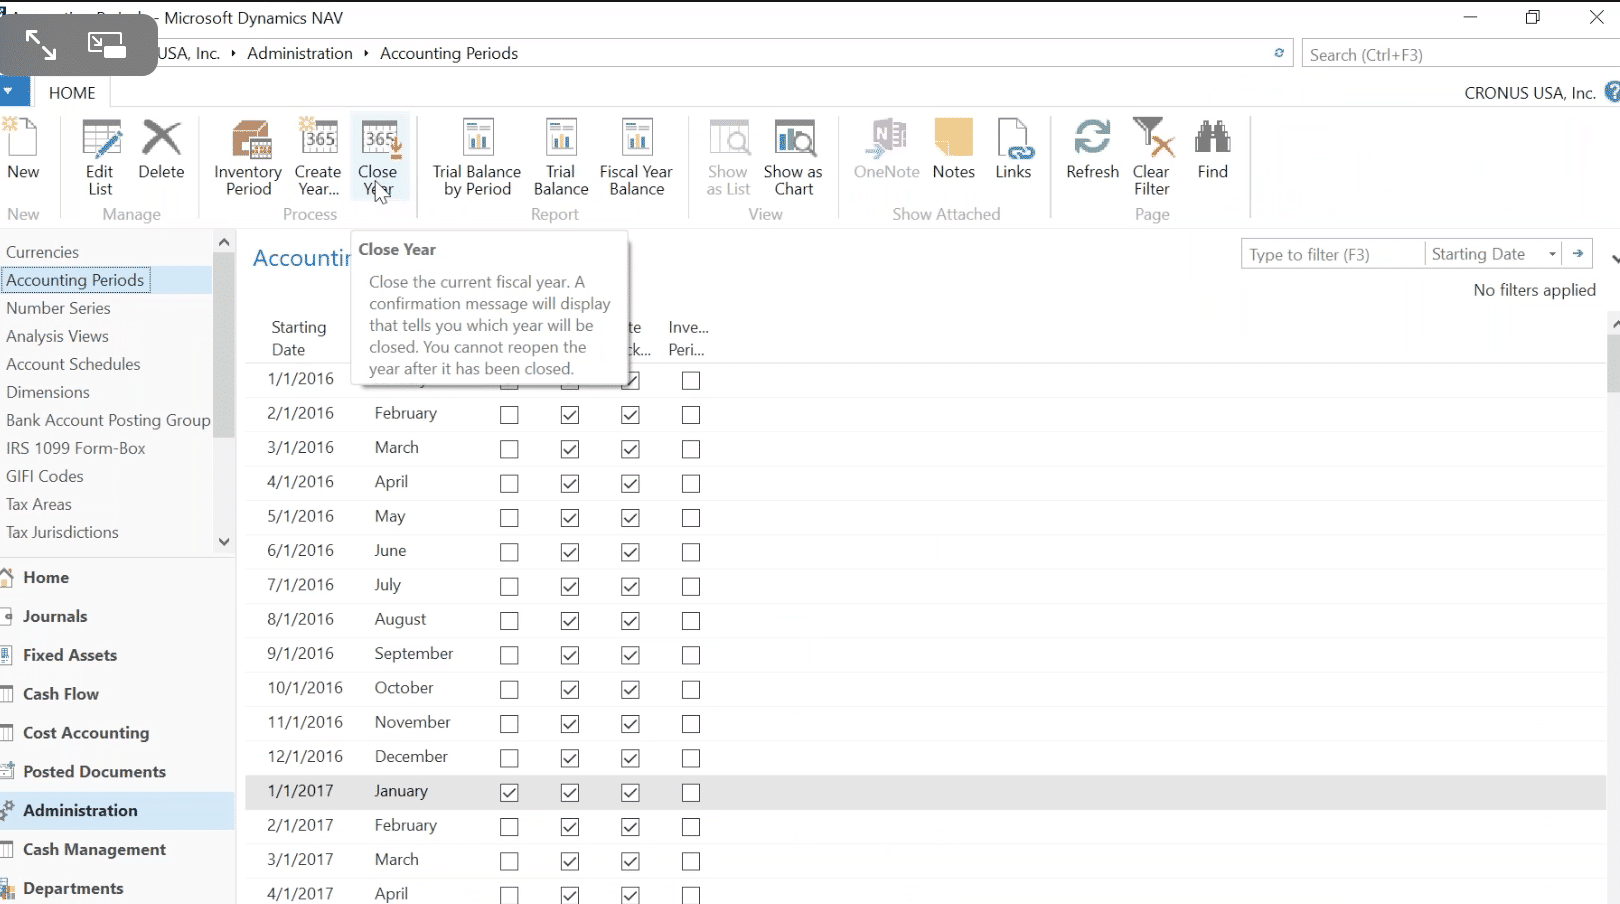
CREATE YEAR
Next, search or navigate to Accounting Period to perform the Create Year task. The accounting periods are added to the page. The Starting Date and Name fields are filled in. The Name field uses the name of the month from the starting date. After the last period in the fiscal year, an accounting period is inserted and the New Fiscal Year check box is selected.
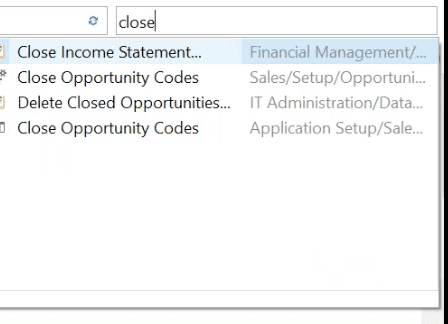
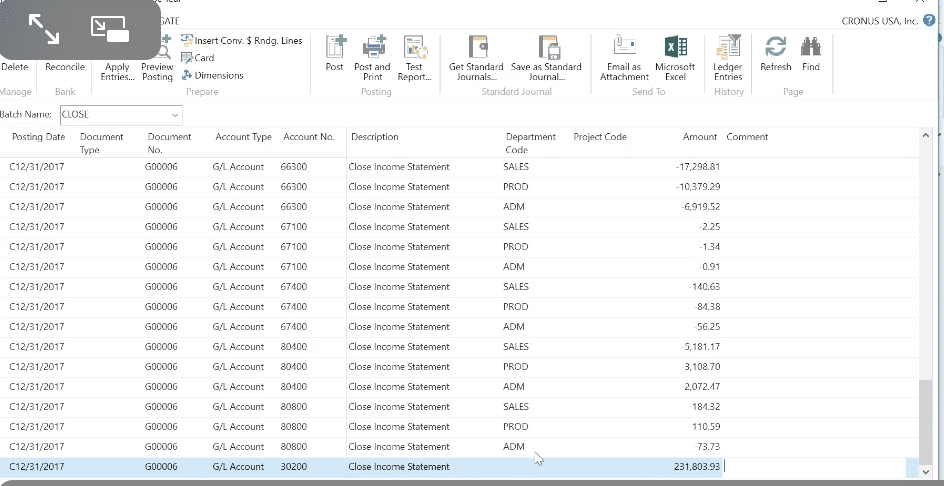
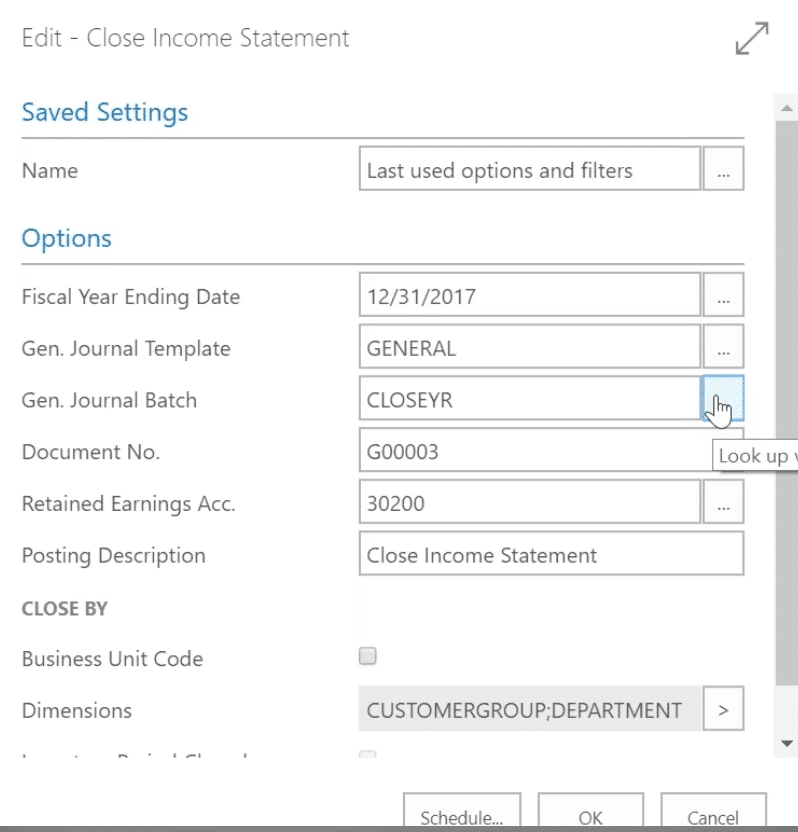
CLOSE INCOME STATEMENT
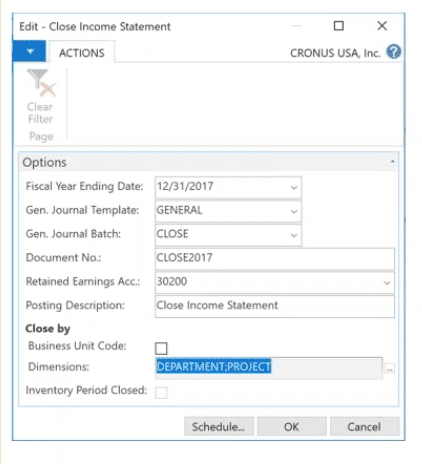
The batch job processes all general accounts on the Income Statement type and creates entries that cancel out their respective balances.
The batch job doesn’t post the entries automatically, except when an additional reporting currency is being used. When an additional reporting currency is being used, the batch job posts entries directly to the General Ledger.
The date on the lines that the batch job inserts in the journal is always a closing date for the fiscal year. The closing date is a fictitious date between the last day of the old fiscal year and the first day of the new year. (ie: C12/31/17)
The Close Income Statement batch job can be used several times. You can post in a previous fiscal year, even after the income statement accounts have been closed, if you run the batch job again.
Fiscal Year Ending Date – This will prefill with the last year that’s closed on the Accounting Period list.
Gen. Journal Template – This will typically be GENERAL.
Gen. Journal Batch – Select an empty batch to create the closing entry.
Document No. – Accept what prefills or enter a Document No.
Retained Earnings – Enter or select the Retained Earnings account to close Net Income/Loss.
Posting Description– Accept what prefills or enter a different description.
Close By:
Business Units – Select if you want an entry to be created for each Business Unit Code. Typically, Business Units are set up in Consolidated Companies.
Dimensions – If you want an entry to be created for each dimension used in the general ledger account, choose the field and select the codes of the dimensions.
ALLOW POSTING TO/FROM
When you specify posting periods, you limit the period in which posting is allowed.
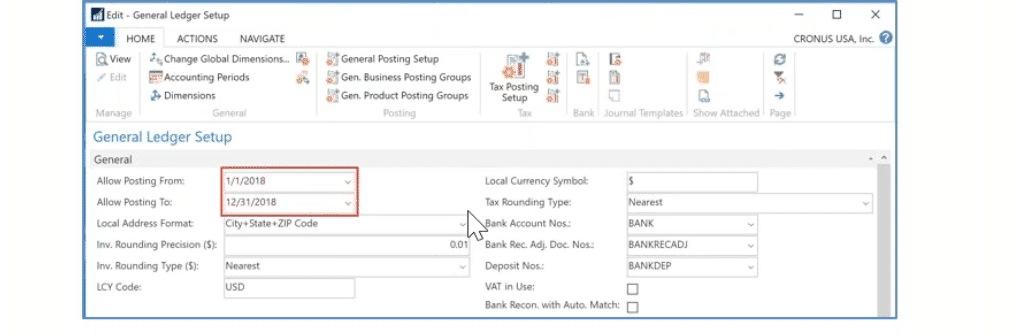
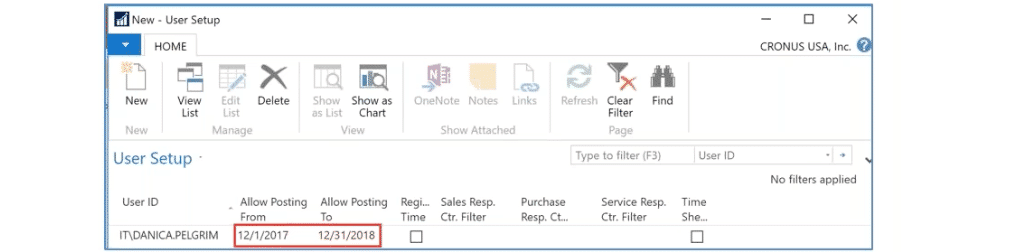
If you want to define different posting periods for different users, you can set them up for each user in the User Setup window. If you enter dates in the User Setup window, the dates entered in the General Ledger Setup window won’t apply to these users.
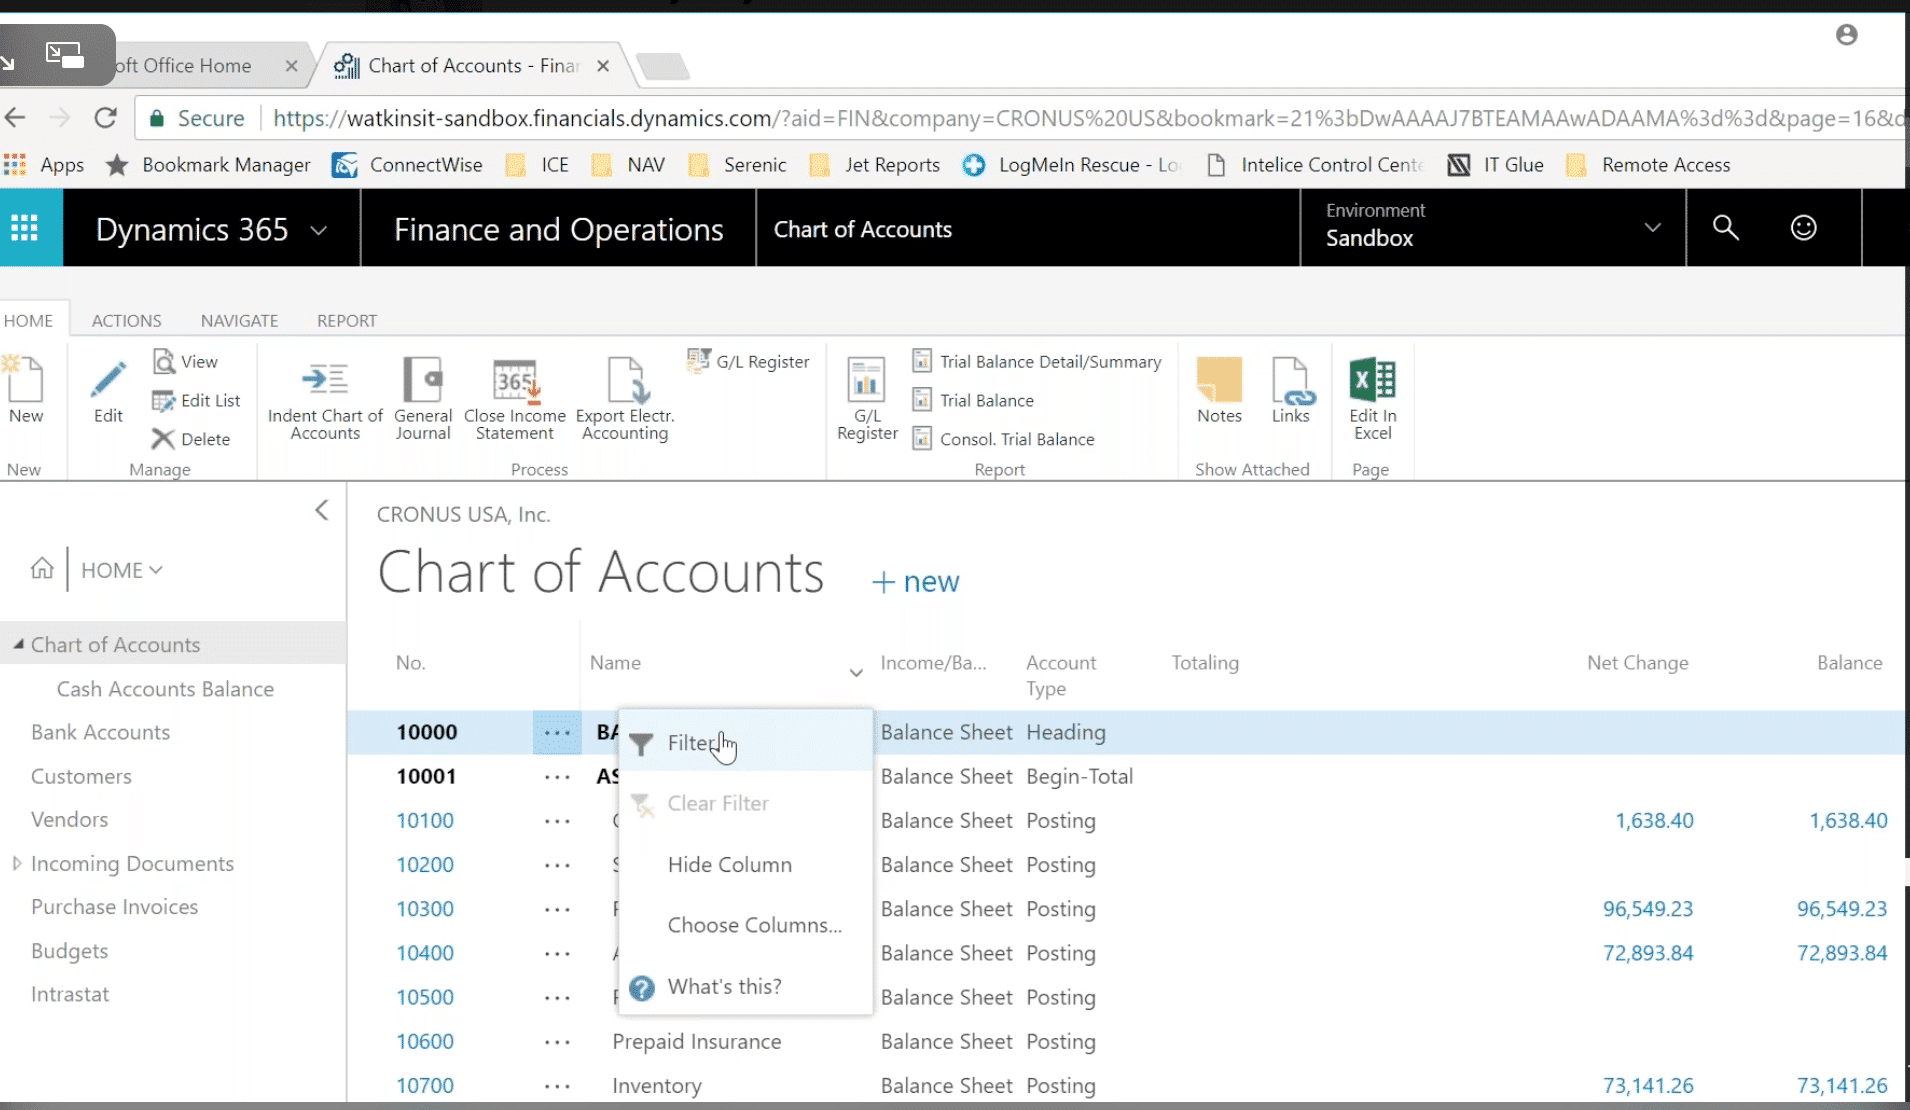
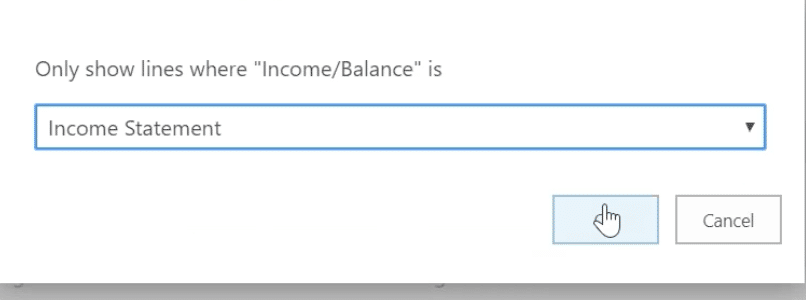
- Review your Chart of Accounts setting for proper Income Statement/Balance Sheet settings.
- Filter Chart of Accounts on the current fiscal year for a Net Income/Loss figure that will be the Retained Earnings Amount in the Close Income Statement entry.
- Make sure the batch selected for the Close Income Statement task is empty. The task will append the batch if there is already something in the batch.
- Modify Allow To/From posting dates regularly to make sure all users are restricted to post to current periods.
Change this to an Income Statement Account and hit OK.
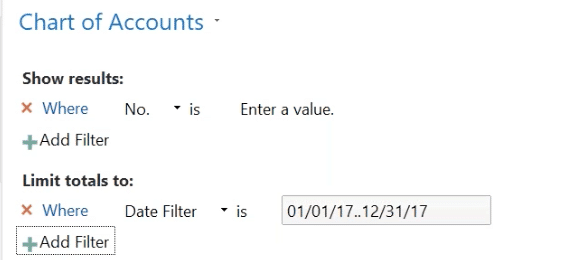
Then put in a Date Filter and Close the Year.
Next go to Close Income Statement.
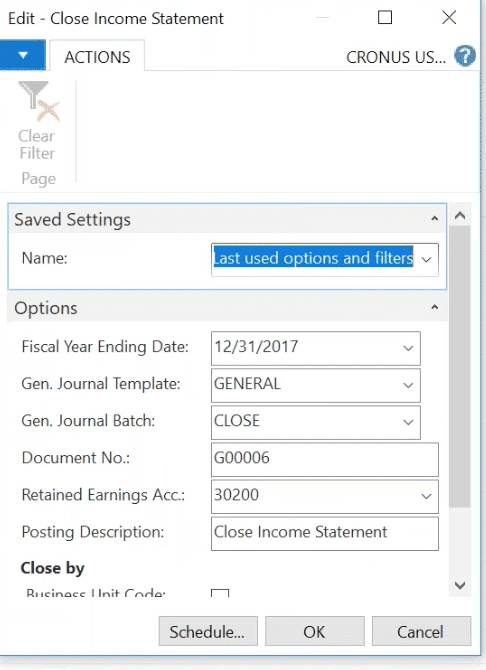
NAV will automatically pull in the date. It puts in the Retained Earnings as well.
And, if you want to manage your Post To/From Dates, just go to your General Ledger to do this.
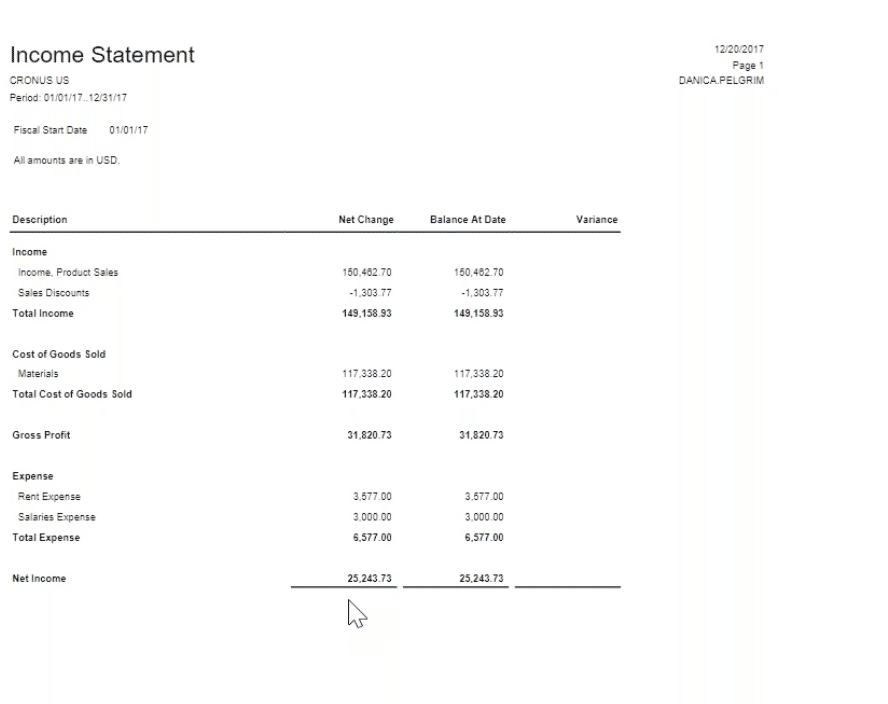
NOTE: In the Web-Based Version of NAV most of these steps will be the same. You want to filter by Income Statement and Balance Sheet. However, you won’t have the Flow Field or Date Filter functions. Instead, you can create an Account Schedule Column Layout where you input a Net Change and Balance at Date, as well as a Variance Column so you can see if there’s a difference in the Net Change and Balance at Date.
The filtering is a little different in the Web-Based Version of NAV.
Next, run the Account Schedule Column Layout and follow the same process you did on the Chart of Accounts List. Be sure to check your Net Change and Balance at Date to make sure the numbers are the same.
If they aren’t, you need to go back and close entries from a prior year. Then follow the same process we did in the Standard NAV version. (The desktop and some screens will look a little different.)
You won’t have a filter pane, so you’ll need to set one. Go to the column you want to filter by in your Account Schedule.
Then, you can manually create the accounts you need.
Then follow the same steps to Close Year as before.
The last step is to close your Income Statement.
So that’s it! Well done!
If you have any questions, don’t hesitate to contact me at Intelice Solutions. I’m always here for you.

Recent Posts


How can we help?
Whether you need immediate help with an IT issue or want to discuss your long-term IT strategy, our team is here to help.
Call us at (301) 579-8066 or complete the form below and we'll help in any way we can.